Duplex Project: Foundation Repair Scope of Work
The duplex project scope of work defines the exact path from distressed property to income-producing real estate asset. By clearly outlining demolition, structural repairs, mechanical upgrades, renovation phases, budgeting, and timelines, investors and contractors create accountability, control costs, and reduce risk throughout the construction process. A detailed written scope is essential for successful fix-and-flip execution, rental stabilization, and long-term portfolio growth—turning uncertainty into a structured, profitable real estate investment strategy.

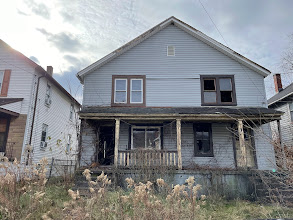
Right-side foundation wall failure on the duplex project—this 28-foot section has caved inward and will be fully removed and rebuilt with a new reinforced footer and block wall.
Foundation Wall Replacement: Step-by-Step Repair of a Failed 28-Foot Basement Wall
Project Location: Duplex Investment Property
Wall Section: Right side foundation wall
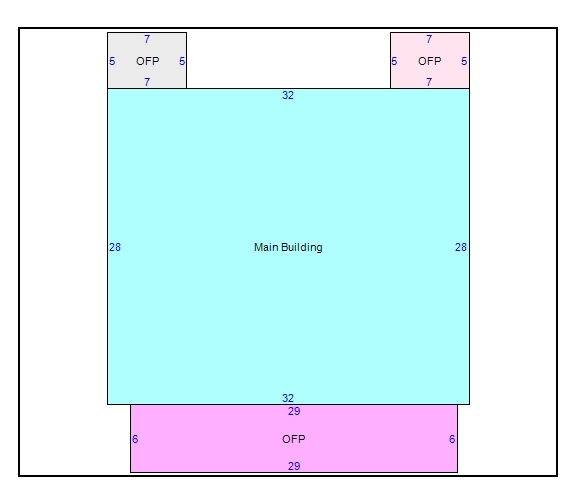
Length: 28 feet
Height: ~8 feet
Repair Type: Full removal and replacement with reinforced footing and CMU block wall
Foundation failures are one of the most serious issues a property can face—but they’re also one of the most misunderstood. On this duplex project, we’re addressing a 28-foot section of basement foundation wall that has caved inward due to soil pressure and long-term structural stress. The roof system was lacking a gutter and water and time did the rest. In the past we have consulted with Forensic Engineers, Structural Enigineers, and Inspectors the fix here is something I understand.
This article documents exactly how we’re repairing it, from excavation and demolition through the installation of a new reinforced footing, block wall, sill plate, and structural beam interface.
This is real work, on a real investment, with real consequences—done the right way.
Understanding the Failure
The existing foundation wall on the right side of the home has failed inward, meaning lateral soil pressure exceeded the wall’s ability to resist it. This type of failure is common in:
- Older homes with unreinforced masonry
- Poor drainage conditions
- Expansive or water-saturated soils
- Long-term neglect or deferred maintenance
Once a wall caves inward, patching is not an option. The wall must be fully removed and rebuilt to restore structural integrity. Demolition and full reconstruction is the best option.
Scope of Work Overview
This repair includes:
- Removing the failed 28’ foundation wall
- Excavating soil to allow safe access and rebuild
- Installing a new reinforced concrete footing
- Rebuilding the foundation wall with concrete masonry units (CMU)
- Replacing the sill plate
- Proper backfill and site restoration
Step-by-Step Foundation Repair Process
1. Site Prep & Safety
Before any demolition begins, the site must be stabilized and protected.
Actions:
- Secure work area (interior and exterior)
- Install temporary supports if needed to carry load
- Confirm utility locations
- Establish layout lines for new wall alignment
Why it matters:
Structural loads must be managed before removing any bearing components.
2. Excavation & Dirt Removal
To safely remove and rebuild the wall, we must expose it fully.
Actions:
- Excavate exterior soil along the 28’ wall
- Dig down to footing elevation
- Remove enough soil to allow:
- Demolition access
- Proper footing width
- Block installation and waterproofing
- Stockpile or haul off excavated dirt as needed
Key consideration:
Soil removal must allow room for forms, reinforcement, and compaction, not just visibility.
Materials
A 12,000 mini excavator will make quick work of the project. We expect the rental which will include a trailer to cost in the neighborhood of $500 with fuel.
3. Demolition of Failed Wall
Once exposed, the failed wall is removed.
Actions:
- Demolish existing masonry wall section
- Remove loose debris and contaminated material
- Clean subgrade and footing area
- Inspect for additional hidden damage
Why full removal is required:
A compromised wall cannot be structurally “repaired” in place—replacement is the only safe option.
4. Layout & Footer Preparation
We are installing a 28’ x 12” x 12” reinforced concrete footer to support the new wall.
Footer Specifications:
- Length: 28 feet
- Width: 12 inches
- Depth: 12 inches
- Reinforcement: Steel rebar (continuous)
Actions:
- Re-establish wall layout lines
- Install formwork as required
- Place rebar per structural requirements
- Verify level and alignment
Why this matters:
The footing distributes load and resists soil pressure—if it’s wrong, everything above it fails.
5. Concrete Footer Pour
Actions:
- Pour reinforced concrete footing
- Vibrate and consolidate concrete
- Screed and finish
- Allow proper cure time before loading
Quality control:
- Confirm footer elevation
- Check straightness
- Ensure reinforcement is fully embedded
Materials
60 / 80lbs. Bags or 1.25 Yards of Concrete $350
10 Pieces of 1/2″ Rebar $75
6. Rebuilding the Wall with CMU Block
After the footing cures, the wall is rebuilt using concrete masonry units (block) up to the sill plate elevation.
Materials:
- Standard concrete block (CMU)
- Type S or Type M mortar (as specified)
- Reinforcement (rebar / bond beam as required)
Actions:
- Lay block courses plumb and level
- Install reinforcement at required intervals
- Tool and strike joints properly
- Build to exact sill height
Why block:
CMU provides strength, consistency, and compatibility with existing foundation systems.
Materials
300 block at and approx cost of $4, with $1500 allowance total
7. Sill Plate Replacement
The existing sill plate must be replaced due to age and exposure.
Actions:
- Remove old sill plate
- Install new treated sill plate
- Anchor sill plate to masonry
- Install sill gasket or moisture barrier
Importance:
The sill plate is the interface between masonry and framing—failure here transfers problems upstairs.
8. Beam & Structural Integration
Once the wall and sill are complete, loads are transferred back into the structure.
Actions:
- Verify bearing points
- Install or re-seat structural beams as required
- Remove temporary supports
- Confirm load transfer is uniform
9. Backfill & Final Grading
Actions:
- Waterproof exterior wall (if applicable)
- Backfill in lifts
- Compact soil properly
- Restore grade to shed water away from foundation
Critical detail:
Improper backfill is one of the leading causes of repeat foundation failure.
Material Checklist
Concrete & Masonry
- 28’ x 12” x 12” reinforced concrete footing
- Concrete masonry units (block)
- Type S or M mortar
- Rebar (per spec)
- Bond beam units (if required)
Structural
- Pressure-treated sill plate
- Anchor bolts / fasteners
- Sill gasket
Site & Misc.
- Excavation equipment
- Disposal for debris
- Compaction tools
- Temporary shoring materials
Why This Repair Matters (From an Investment Perspective)
The exterior wall which has a significant sag can be easily corrected. With a solid foundation we should be able to reframe a secondary wall on the interior side of the sagging wall. Installation of a beam in the basement will make the framing above easier to install. We will allow for a week to get through these tasks. As I write this its, 10 degrees out and we just had a major snow storm.
As a real estate investor, foundation integrity is non-negotiable:
- Protects long-term property value
- Prevents future water and structural damage
- Ensures insurability and financing eligibility
- Preserves safety for occupants
This repair turns a liability into a stabilized asset, allowing the duplex to move forward in the renovation and value-add process.
Real Projects. Real Repairs. Real Accountability.
At MarcusGeiser.com, I document real-world real estate projects—not theory, not fluff. This foundation repair is one step in transforming a distressed duplex into a safe, durable, income-producing property. Investing in properties relies haevily on the value adds. Structural repairs are not difficult if you get the right advice and make a solid plan.
If you’re a property owner, investor, or contractor dealing with foundation issues, understanding the process is the first step to making the right decisions. If you need help or are looking to Joint Venture on properties in and around the Pittsburgh market reach put. 412-401-5883